


Regular backups, which can be configured in the admin panel, not only allows you to ensure the safety of data, settings, and user accounts, but also allows you to transfer Streaming Radio Platform accounts from one server to another.
Please note that to make a full backup of all accounts of all radio stations on the server, the server must have sufficient free disk space, that is, if user files occupy, say, 50 gigabytes, then the server must have at least 100 gigabytes of disk space.
If for some reason the disk is limited and it is not possible to copy all user data, including media files, it is possible to enable the “Quick backup” option in the backup settings in the Administrator Interface: in this case, the user’s media files are not copied, only the settings files and the database. It is recommended to enable at least this mode, as it is usually always possible to re-upload media files, but it is quite difficult to restore the setting files and the database.
Backup is extremely important, as the hard disk, database, and other components on the server may fail and data recovery can be expensive.
Server backup
You can set up regular backups through the WEB-based admin interface. To do this, select the desired radio account in the Radio section and click the backup button:
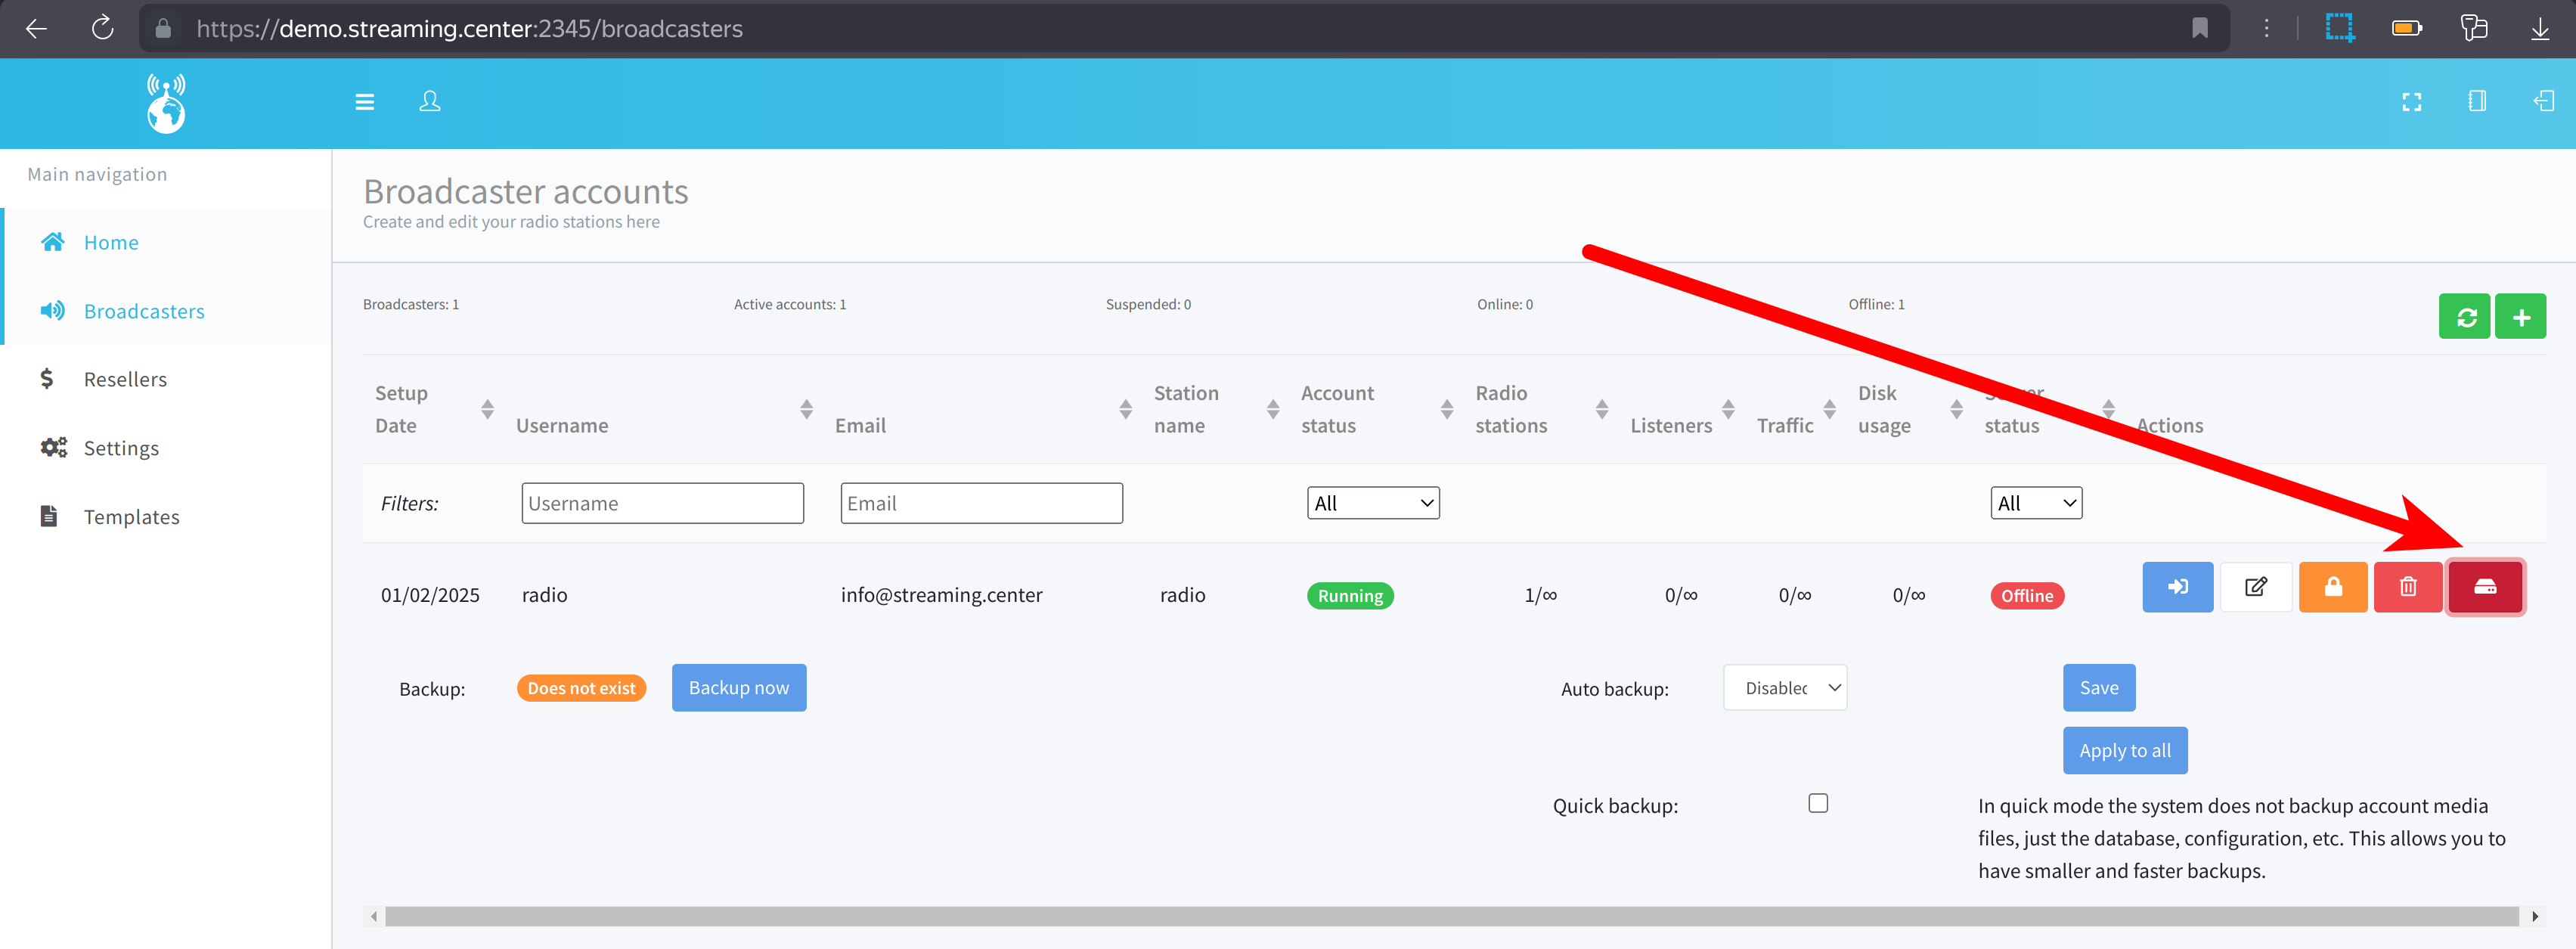
You can create a backup immediately, or schedule regular backups according to a schedule. In the “Quick backup” mode, the system creates only client database dumps, configuration files, and so on, basicaly everything except for media files. This way, backups will not take up much space and the user’s settings will not be lost. Backup settings can be saved for a sigle particular account, or applied to all account using the “Apply to all” button.
Backups are created in the /var/users/backup directory, each file there is a copy of the user’s folder and its database, the file is named similarly to the username in the system.
If you don’t have enough space on your server to store backups, you can connect network storage to this directory using Linux tools, for example via NFS, SSHFS, S3 Storage, and so on.
Running the backup via the sever console
In addition to the WEB-based administrator interface, you can run backups via the terminal:
cd /opt/bin
python3 sc_backupThe script supports command-line parameters, for example, to backup all the accounts on your server, run:
cd /opt/bin
python3 sc_backup all
To start the quick backup, run the folling command
cd /opt/bin
python3 sc_backup all quick
Restoring from a backup
Let’s say you have a backup file called radio.tar.gz to restore it, just copy it to the /var/users/backup_restore directory and the system will restore it automatically. In case of problems, an error message will be displayed next to this account in the administrator’s WEB interface.
Important: if you migrate and restore a backup from one server to another, there may be a port conflict, that is, the ports of the DJ, Icecast or Shoutcast servers of one account on one server may already be occupied by some other existing account on another server.
In this case an error will occur during recovery, or when such a radio is running, there may be problems with starting the radio or connecting live stream Djs, so it is better to check account ports for conflicts before the migration.
Migration to a new server using a backup of the current server
If you are upgrading your hardware, or the old server has started to fail, migration to the new server is carried out by fully backing up the old server accounts and deploying backups to the new one. What needs to be done:
On the old server:
- Update
to the latest version of Streaming.center:
bash <(curl -s https://streaming.center/dist/update.sh) - Create a full backup of all accounts
cd /opt/bin
python3 sc_backup all
Keep in mind that you have to have enought disk space to create a full backup.
On the new server:
-
Install the software the usual way. During installation, it is not necessary to specify the domain name of the old server (it may still be configured to the old server IP in your DNS settings), while restoring backups, you can install the platform to the IP address and change the domain name and configure SSL certificates later using the utilities .
-
Comment-out the following lines in
/etc/crontabfile:During the backup recovery, do not let any other utilities run on schedule.*/5 * * * * root /usr/local/bin/content_indexer 1>/dev/null 2>/dev/null */1 * * * * root python3 /opt/bin/sc_stats 1>/dev/null 2>/dev/null */15 * * * * root python3 /opt/bin/sc_backup 1>/dev/null 2>/dev/null */1 * * * * root python3 /opt/bin/sc_accounts 1>/opt/acc.out 2>/opt/acc.err 0 * * * * root python3 /opt/bin/awstats 1>/dev/null 2>/dev/null 30 2 * * 1 root /usr/bin/letsencrypt renew -
Copy the backup files from the old server to the
/var/users/backup_restorefolder on the new server. -
Navigate to
cd /opt/binon the server console. -
Run:
python3 sc_backup.pyc- command to restore the backups. In case of errors, you will be able to see them in the console. -
If the domain is also moving, change the old IP address to a new one in the DNS settings of the domain and wait for the domain to transfer (it may take several hours)
-
Setup the domain name for the radio using the
cd /opt/bin && ./change_hostcommand -
Run
cd /opt/bin && ./ssl_enableto setup SSL centificate. -
Run the update script:
bash <(curl -s https://streaming.center/dist/update.sh) -
Uncomment the lines in the `/etc/crontab’ file that were commented out in step 2.
Restoring radio account templates (optional)
So far, the backup script does not support restoring templates that you could have created in the administrator’s WEB interface, but they can be manually migrated by creating a backup copy of the corresponding table on the old server and restoring it on the new one:
If your root password for the MySQL server is “123” (it can be found in the file /opt/bin/utils.ini), run the following commands on the old server:
mysqldump -u root -p123 sc_billing templates_broadcaster > templates_broadcaster.sql
mysqldump -u root -p123 sc_billing templates_reseller > templates_reseller.sql
Next, copy the files templates_broadcaster.sql and templates_reseller.sql to the new server and restore them there with the command:
mysql -u root -p123 sc_billing < templates_broadcaster.sql
mysql -u root -p123 sc_billing < templates_reseller.sql- the `-p’ key specifies the MySQL root password, in our example - “123”, you will have a different one!