


Streaming Internet Radio with BUTT
Important: This Guide Applies to Streaming.Center Only
The setup described in this article applies exclusively to Streaming.Center Internet-radio control panel and uses streaming credentials generated inside your Streaming.Center account.
How Streaming Works with Streaming.Center (Short Overview)
To stream audio, you must first create a DJ in the “DJs” section of the Streaming.Center control panel and then configure your streaming software using the credentials provided there; this DJ-based setup works for all live streaming software supported by Streaming.Center, not only BUTT.
What is BUTT?
BUTT is a free, open-source audio streaming encoder designed specifically for live internet radio broadcasting. It captures audio from a selected input device (such as a microphone, mixer, or virtual audio interface), encodes the signal, and sends it directly to a remote streaming server.
BUTT is widely used by DJs, presenters, and internet radio stations because it is lightweight, stable, and focused on one task only: reliable live audio streaming.
Supported Operating Systems
BUTT is a cross-platform application and works on all major desktop operating systems:
- Windows
- Linux
- macOS
This makes it suitable for most broadcasting setups, regardless of the operating system used.
Where to Download BUTT
You should always download BUTT from the official project website to ensure compatibility and security:
https://danielnoethen.de/butt/
Choose the installer that matches your operating system and follow the standard installation process.
Creating a DJ for Live Streaming
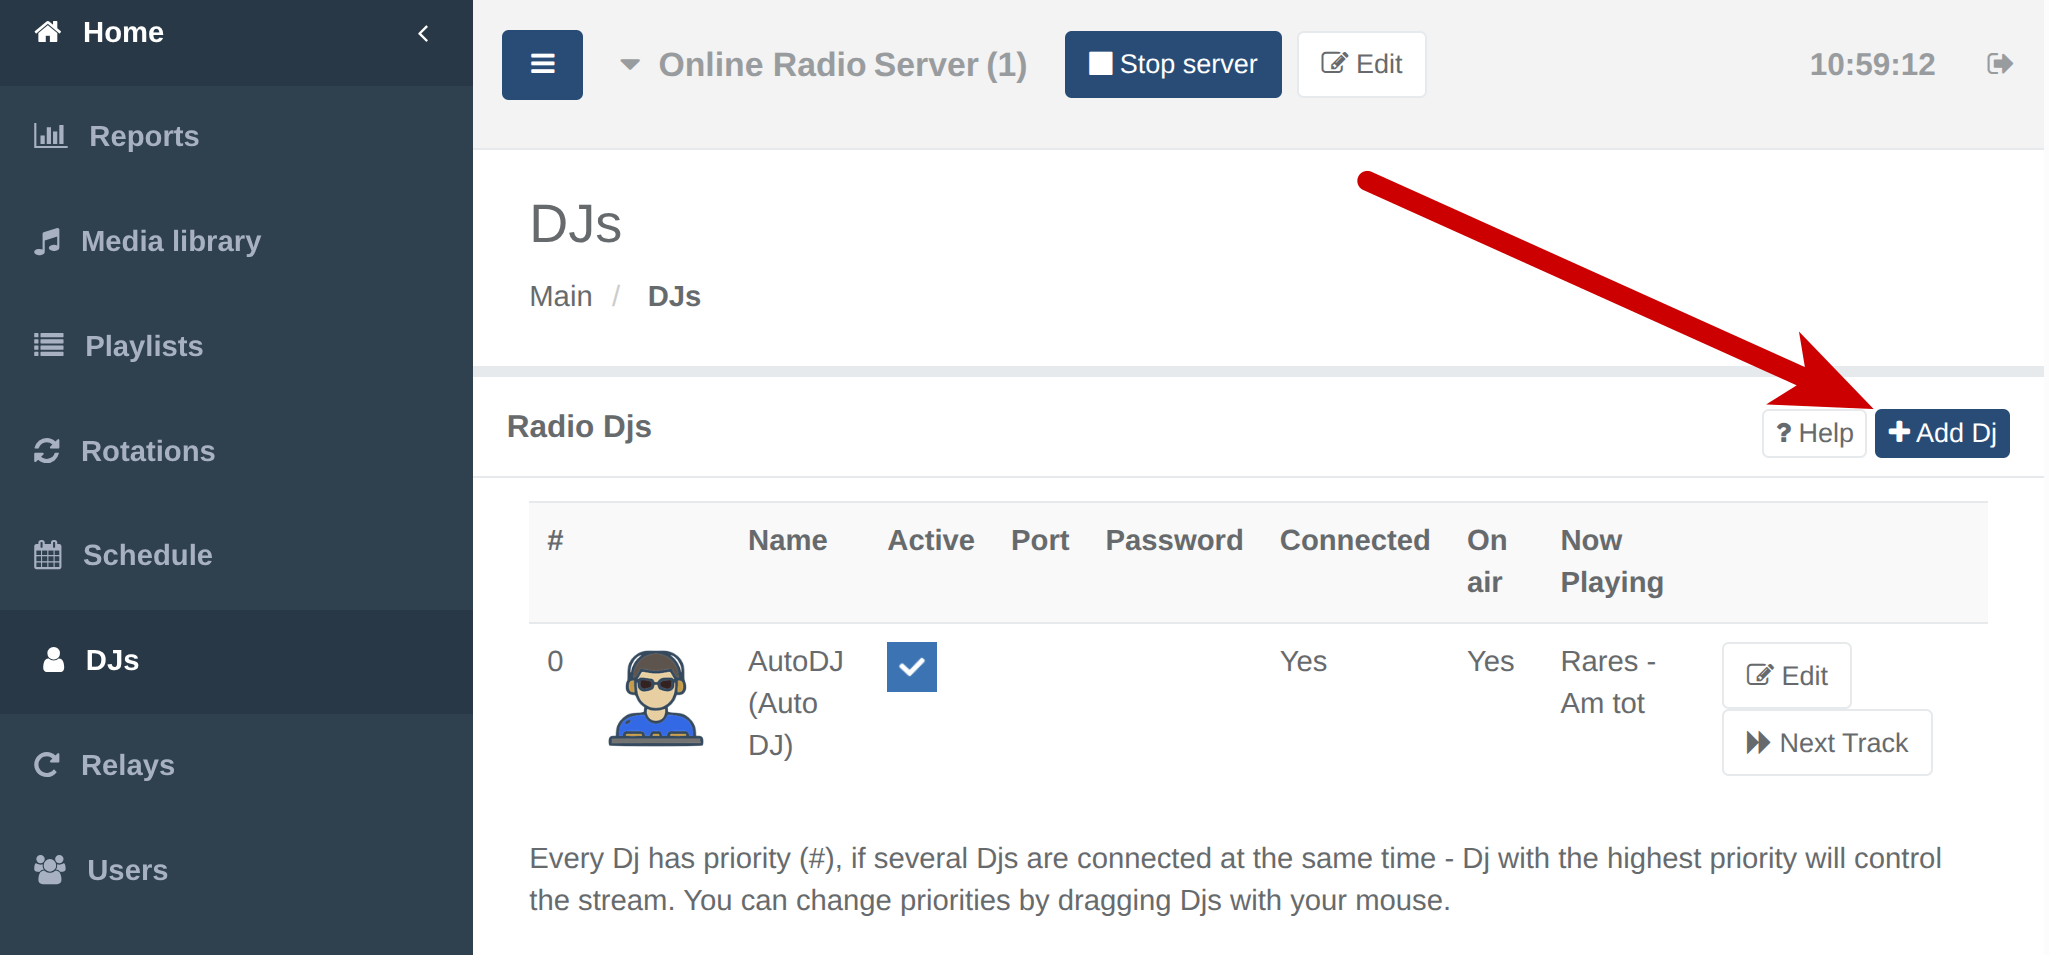
Log in to the Streaming.Center broadcaster interface and navigate to the “DJs” section. By default, this section contains only AutoDJ, which is used for automated playback. To enable live streaming, click the “Add DJ” button and create a new DJ account that will be used specifically for live broadcasts.
DJ Creation Settings
After clicking the “Add DJ” button, a DJ creation form will appear. In this form, select “Desktop / Standalone application” as the Broadcast using option, as this mode is intended for external streaming software such as BUTT. Then upload a DJ avatar image, specify a DJ name, and set a password — this password will later be used in the BUTT streaming settings.
Once all fields are completed, click the “Add DJ” button. After the DJ is created, our system will automatically allocate a dedicated streaming port for this DJ, which will be used for live broadcasting.

Viewing DJ Connection Parameters
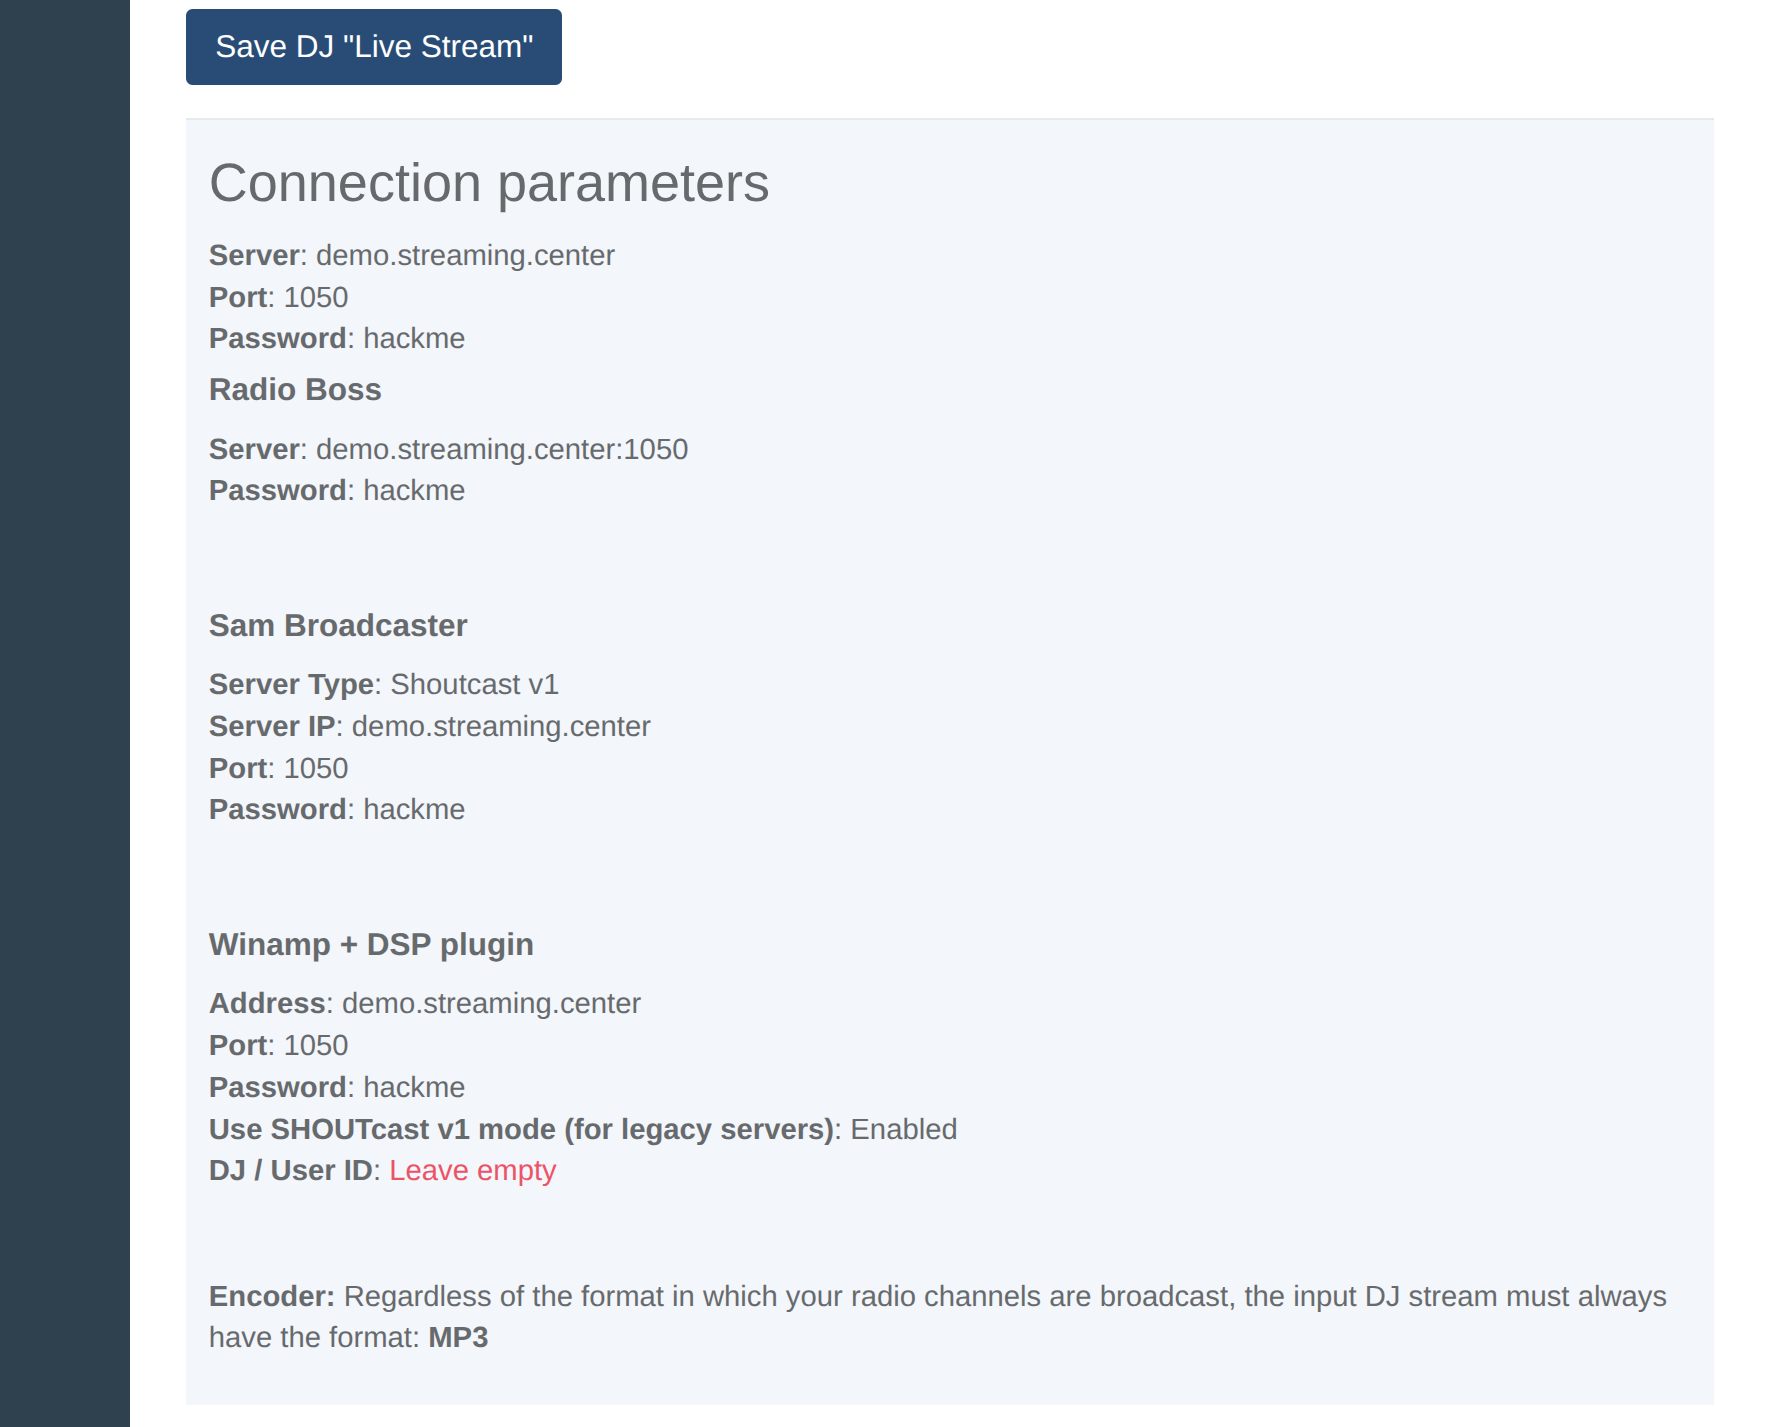
After the DJ is created successfully, it will appear in the list of DJs for the radio server. Locate the newly created DJ and click “Edit” next to it. This will open the DJ settings page, where you can find connection details for the most commonly used streaming software under the “Connection parameters” section.
To connect from BUTT, you will need the following three parameters provided by the Streming.Center control panel:
- Server hostname — use the hostname exactly as shown, without any
http://orhttps://prefix (this is important, as adding a protocol is a common mistake). - Port — a numeric value only.
- Password — the DJ password you set during DJ creation.
These parameters will be entered directly into the BUTT connection settings to establish the live stream.
Adding Your Radio Station to BUTT
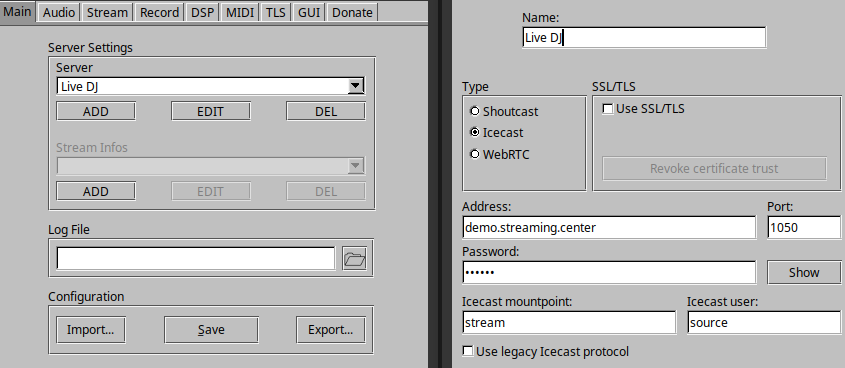
Open BUTT and click the Settings button. In the settings window, remain on the Main tab, then click the Add button. This action will open the Add Server window, where the streaming connection details for your radio station will be entered.
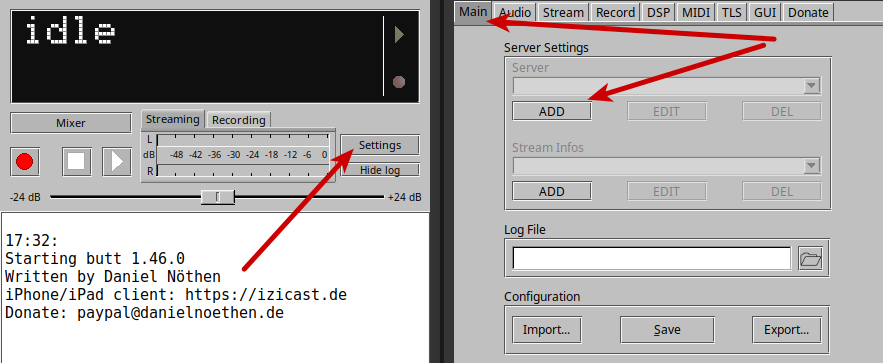
Configuring the Server in BUTT
In the Add Server window in BUTT, you need to provide the following settings:
-
Name — this is an internal name used only inside BUTT to identify the server; it does not affect the stream itself and can be any value you prefer.
-
Type — BUTT offers two options: Shoutcast and Icecast.
Since Streaming.Center automatically detects the stream type regardless of whether your radio server is configured as Shoutcast or Icecast, you can select either option — the choice does not affect streaming.
If you select Shoutcast as the Type
- Address — enter the server hostname exactly as shown in the Streaming.Center Connection parameters (for example:
demo.streaming.center), without anyhttp://orhttps://prefix. - Port — enter the numeric port value provided by Streaming.Center.
- Password — enter the DJ password you set during DJ creation.
If you select Icecast as the Type
- Address, Port, and Password must be filled exactly the same way as described above.
- The Icecast mountpoint and Icecast user fields can contain any value — they are ignored by Streaming.Center and do not affect the connection.
Important Notes
You only need to fill exactly 4 required fields:
- Name
- Address
- Port
- Password
All other fields should be left unchanged. Entering incorrect values in additional fields may cause the stream to not work properly.
Once these values are entered, click Save to store the server configuration.
Connecting and Going On Air
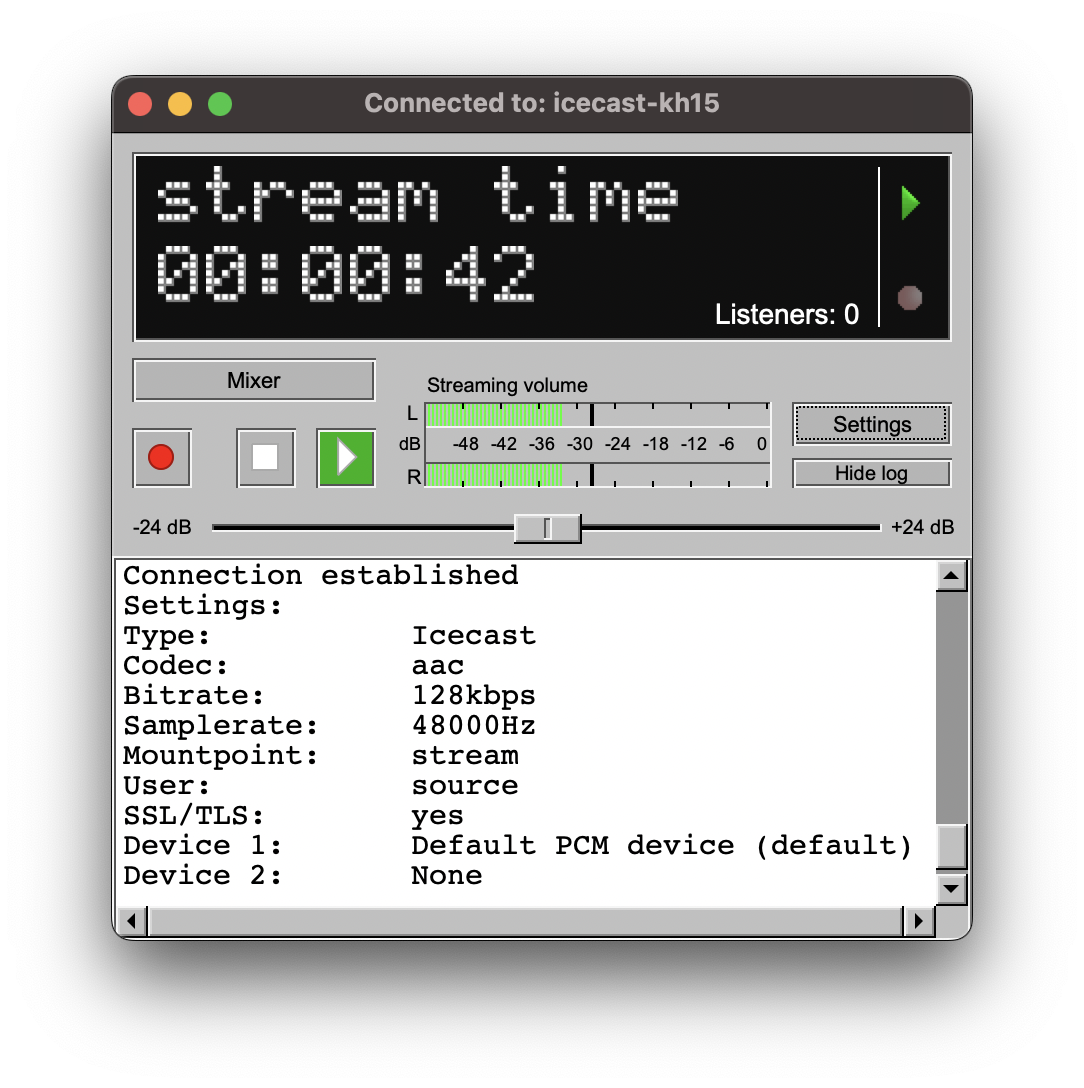
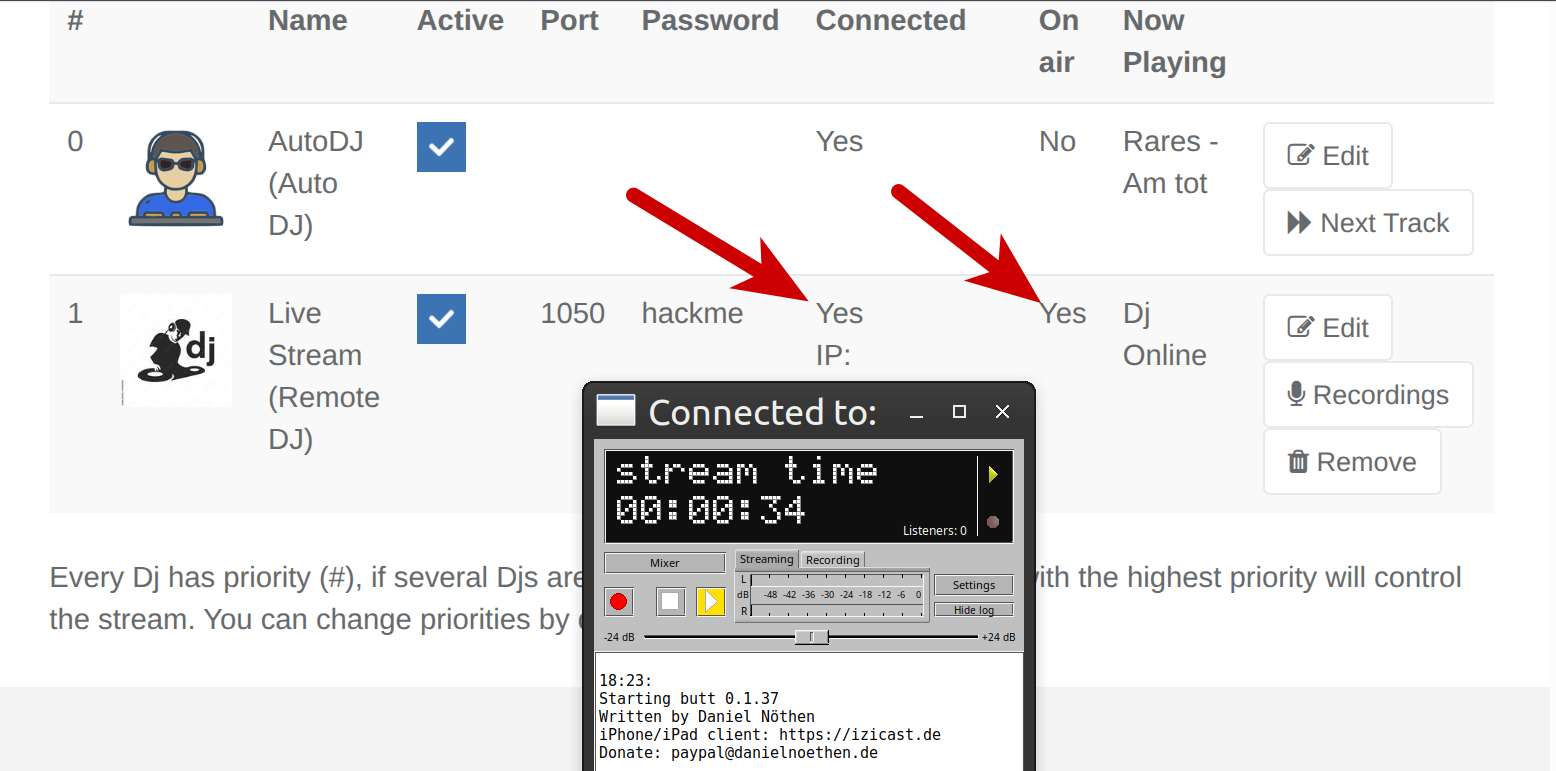
After saving the server settings, click the “Connect to server” button in BUTT. If all parameters are correct, BUTT will display a “Connected” status along with a running time counter, indicating that the connection to the streaming server has been successfully established.
At the same time, in the Streaming.Center control panel, refresh the DJs page. The DJ status will first change to “Connected: Yes”. After the system buffers the incoming stream, the “On Air” status will also switch to “Yes”. This confirms that the DJ is connected and is now broadcasting live.
Audio Quality Settings (Recommended)
You may now return to Settings in BUTT and open the Audio tab to configure audio streaming parameters such as format and bitrate.
Because Streaming.Center automatically re-encodes the incoming source stream into all output formats and bitrates configured in your control panel, it is recommended to use the highest possible bitrate and quality in BUTT. This ensures optimal audio quality across all listener streams generated by the platform.