


Webcaster: broadcast live and take listener calls from your browser without installing additional software
What is Webcaster?
Webcaster is a built-in tool in our Streaming.Center Internet radio control panel that lets you go live directly from your browser without installing additional software such as Sam Broadcaster, RadioBoss, Winamp, BUTT, or any other broadcasting app.
With Webcaster, you can:
- speak into your microphone directly from the browser;
- play audio files on air;
- run a live show with low latency;
- use the built-in Opus browser codec for high audio quality;
- accept listener calls live on air without requiring callers to install anything.
This is especially convenient when you need to go live quickly from a desktop, laptop, smartphone, or tablet, while keeping the call-in process as simple as possible for listeners.
Although our Webcaster may look similar to the open-source Webcaster from Liquidsoap, our version is a complete rewrite of the interface and the audio encoding layer. Unlike the open-source version, our Webcaster also supports listener calls.
Main feature
One of Webcaster’s most useful features is the ability to bring listener calls into a live broadcast.
Here is how it works:
- the host sends the listener a special call link;
- the listener opens it in a browser on their phone or computer;
- the listener enters their name and clicks the call button;
- the host sees the incoming call inside Webcaster;
- the host can accept or reject the call;
- after accepting it, the host can put the caller on air with a separate button.
In other words, neither the host nor the listener needs to install anything.
How it works overall
Webcaster opens in a browser as a dedicated broadcasting page.
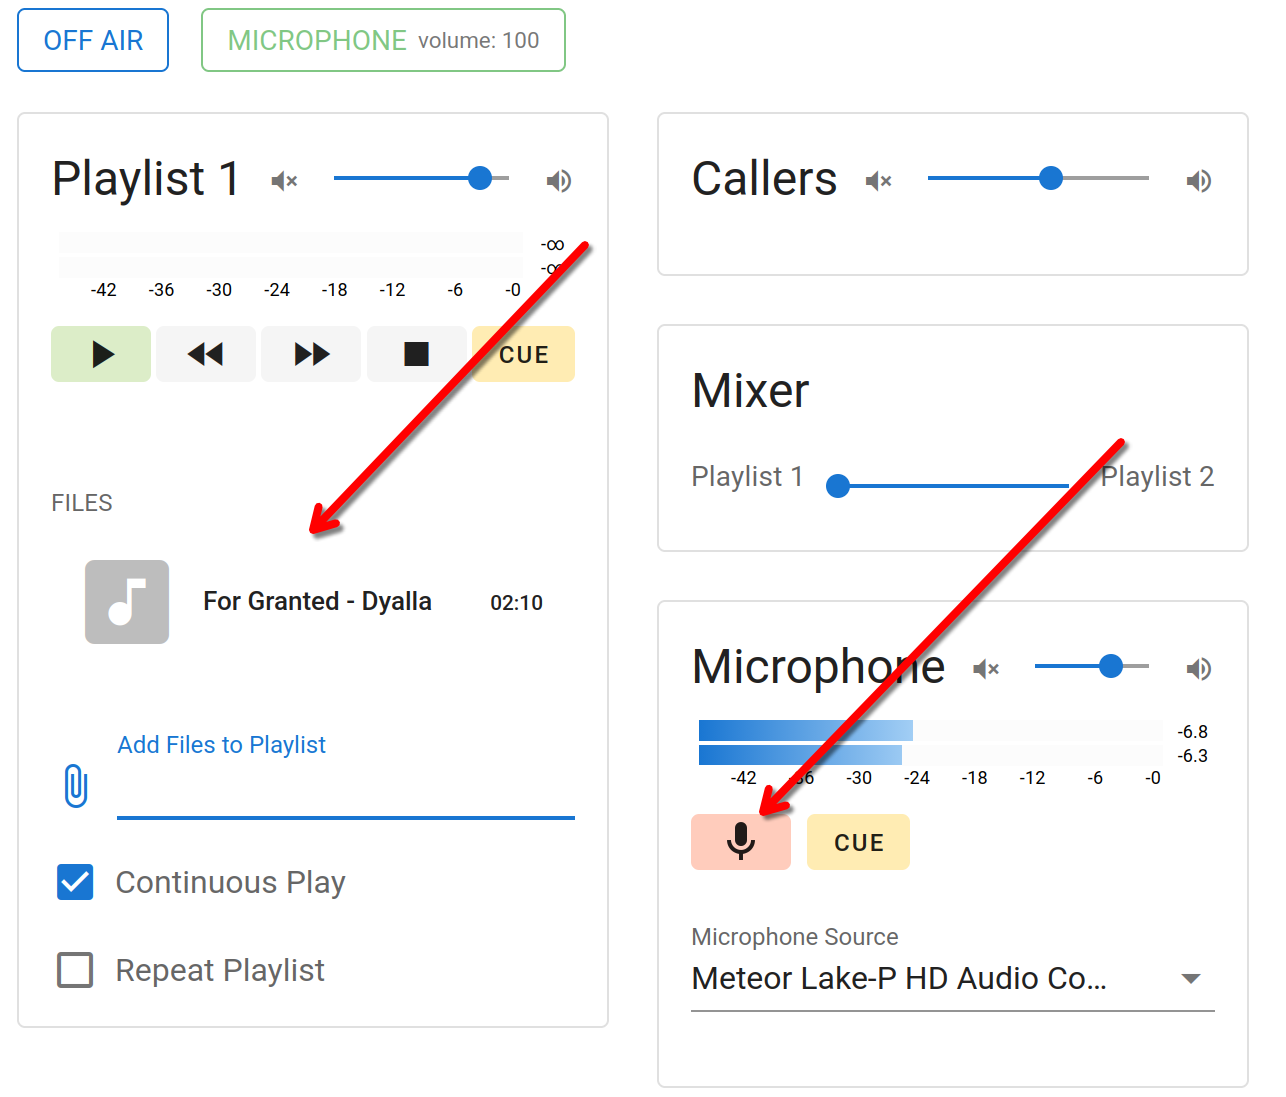
After connecting to the streaming server, the host can use one or several audio sources at the same time:
- microphone;
- audio files;
- incoming listener calls.
The browser mixes the selected audio and sends it to the streaming server, and from there it goes live on your radio station.
How to set up Webcaster in the Streaming.Center control panel
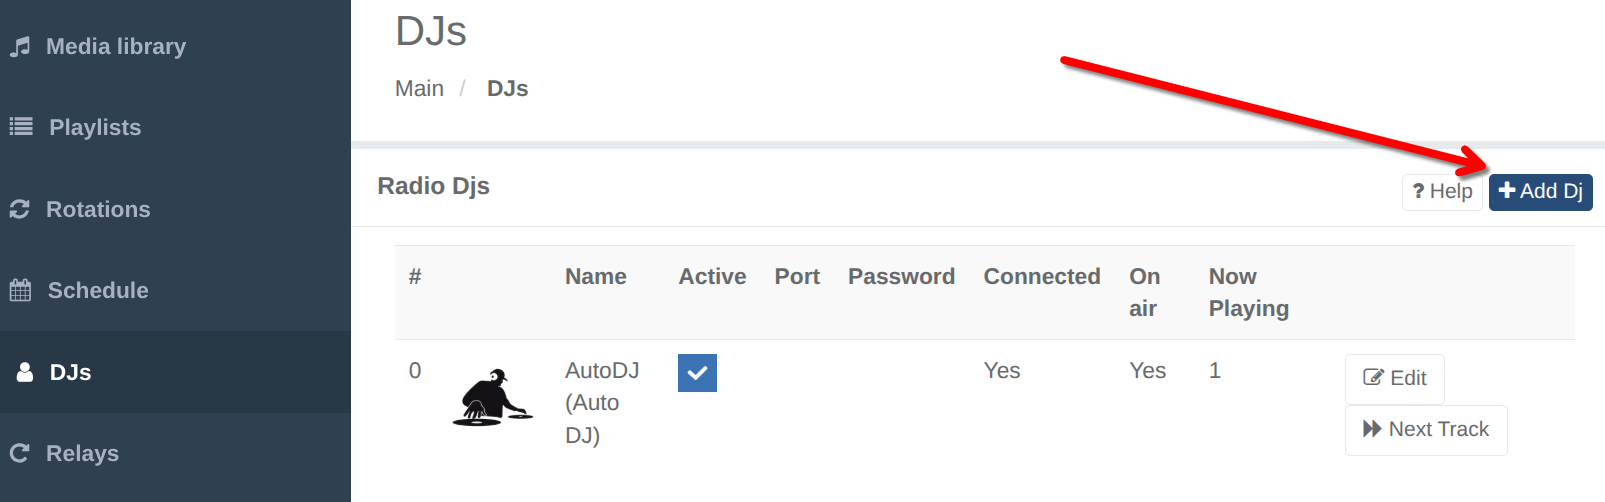
Step 1. Open the “DJs” section
Open your radio control panel and go to the “DJs” section.
Step 2. Add a new DJ
Click “Add DJ”.
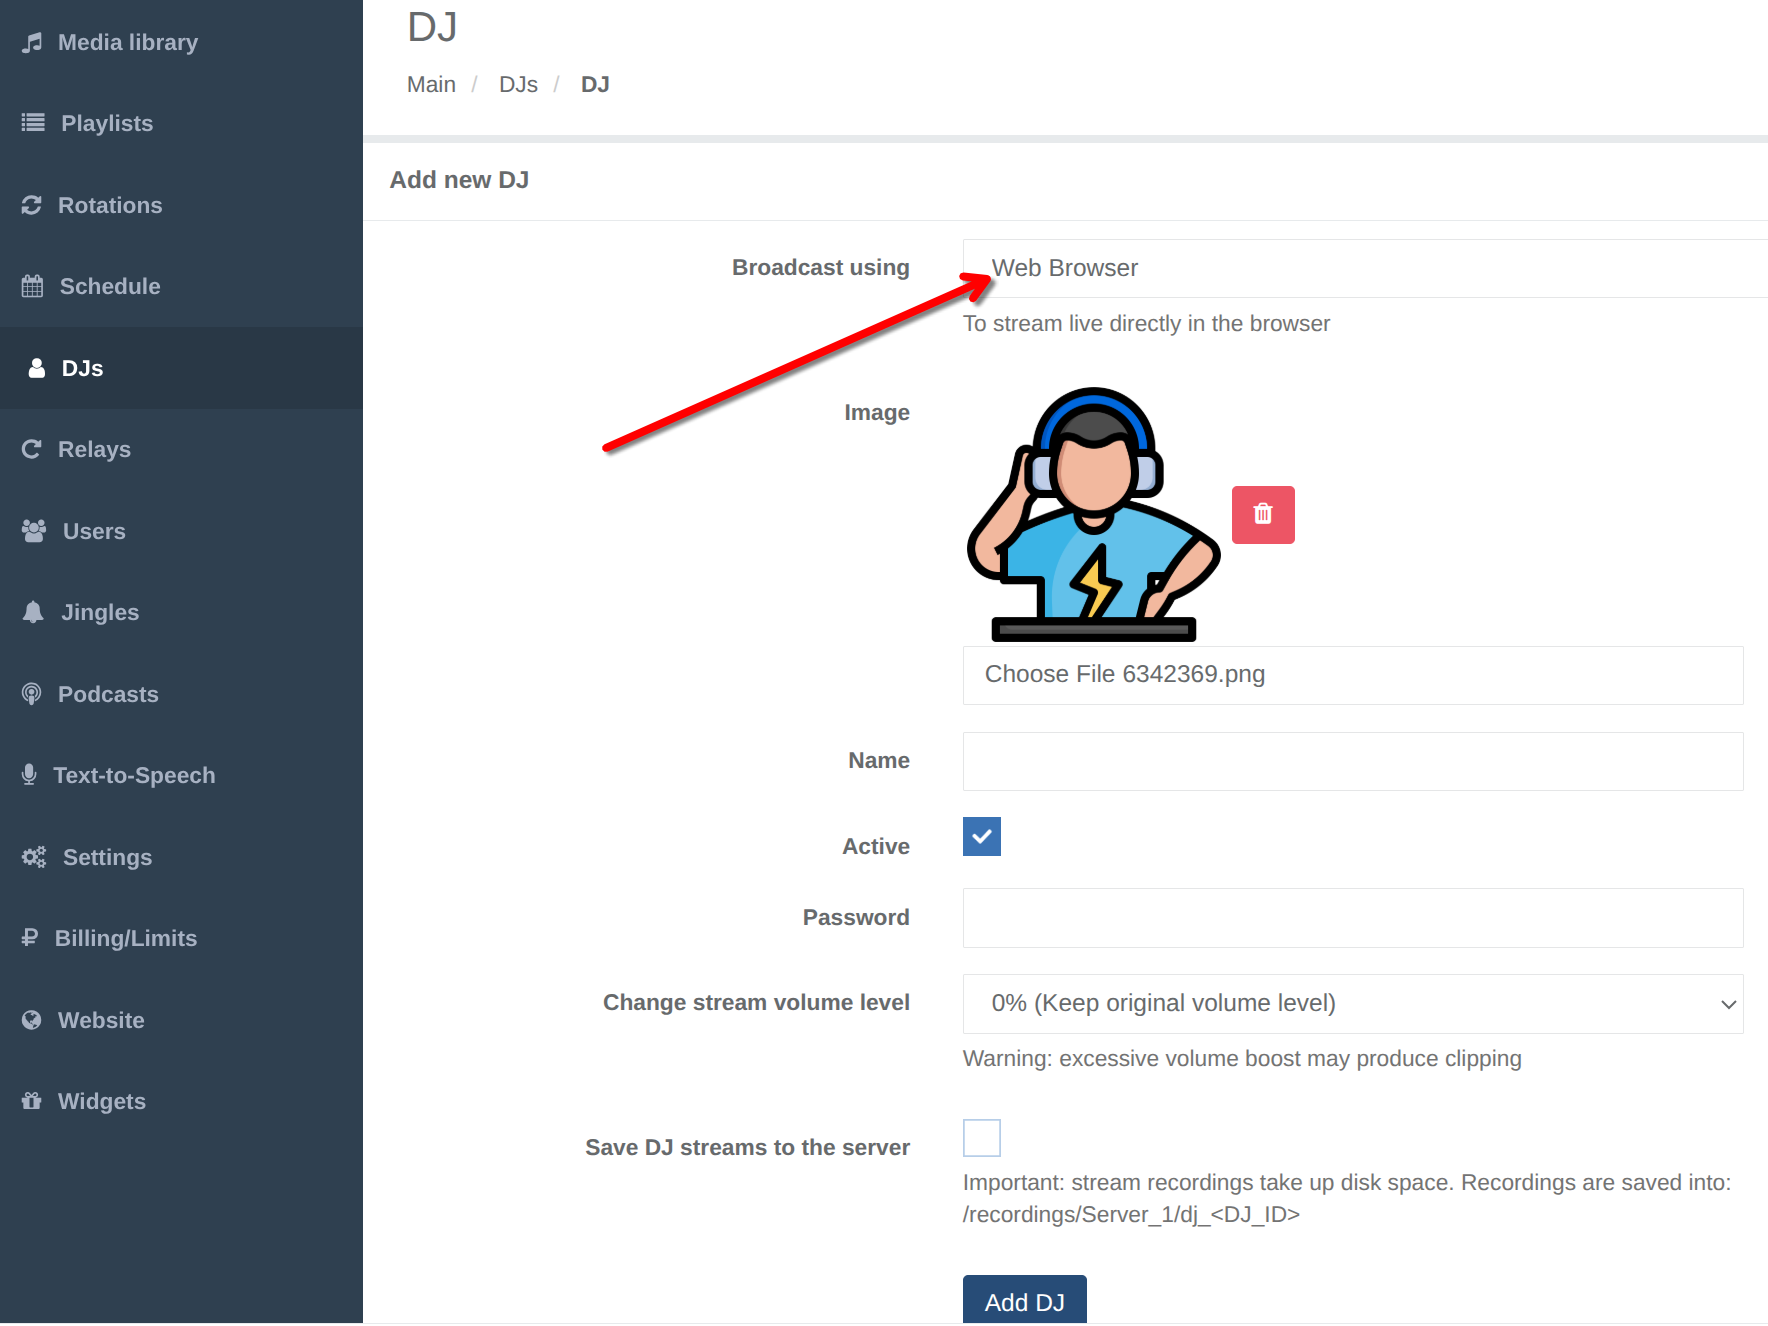
Step 3. Choose browser broadcasting
When creating the DJ, choose “Web browser” in the “Broadcast using” field.
Then save the DJ.
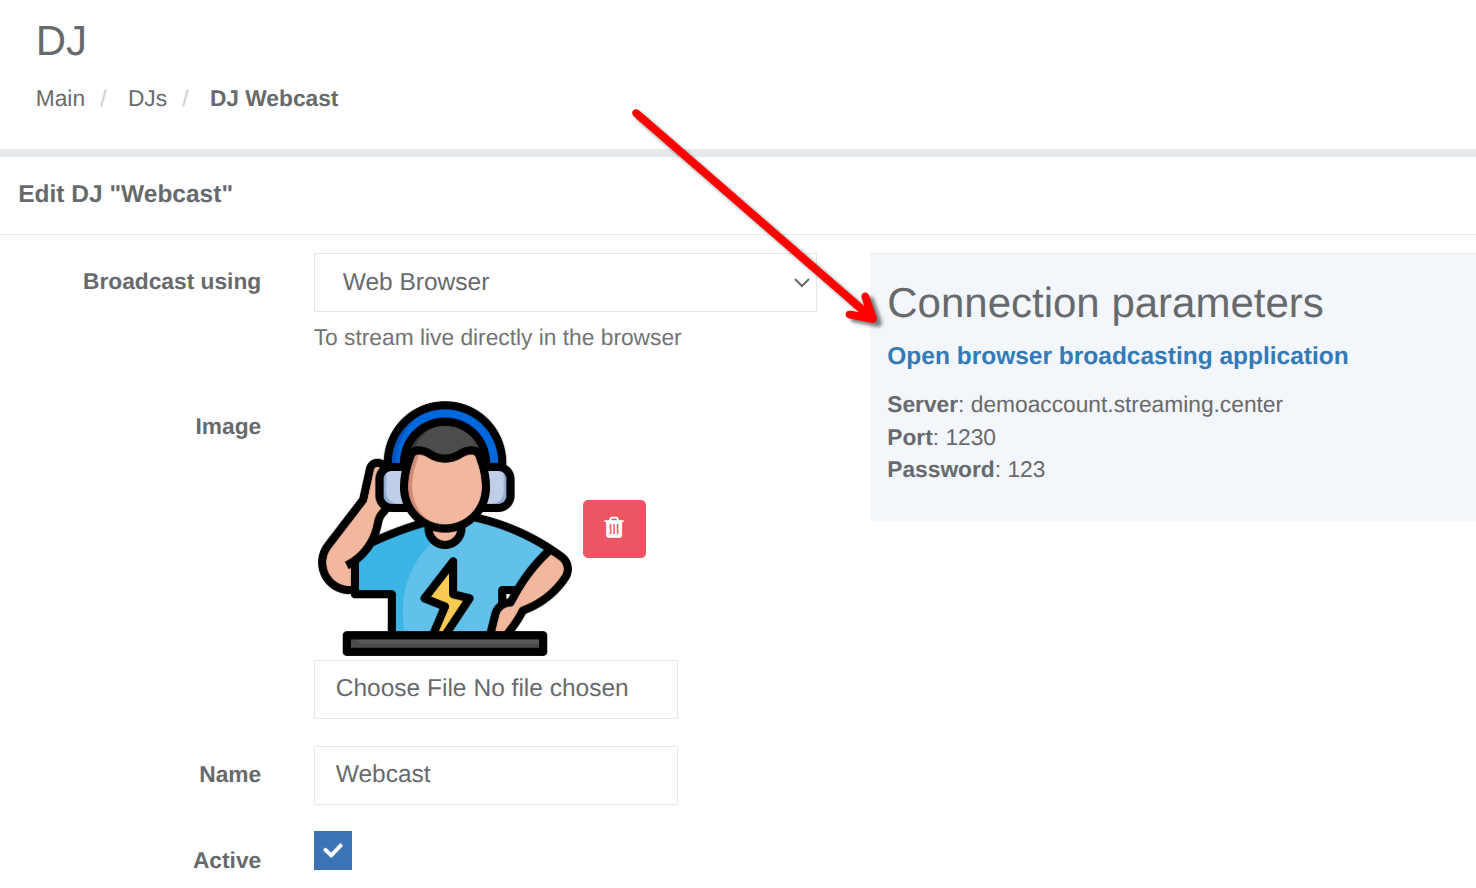
Step 4. Open the broadcasting page
After adding the DJ, click on “Edit” and you have two options:
- click “Edit” to view the connection details: server address, port, and password;
- or simply click “Open browser broadcasting application”.
The second option is more convenient because the link already contains the required parameters, so the connection form will be filled in automatically.
You can also open Webcaster directly here: https://streaming.center/webcast2/
How to go live with Webcaster
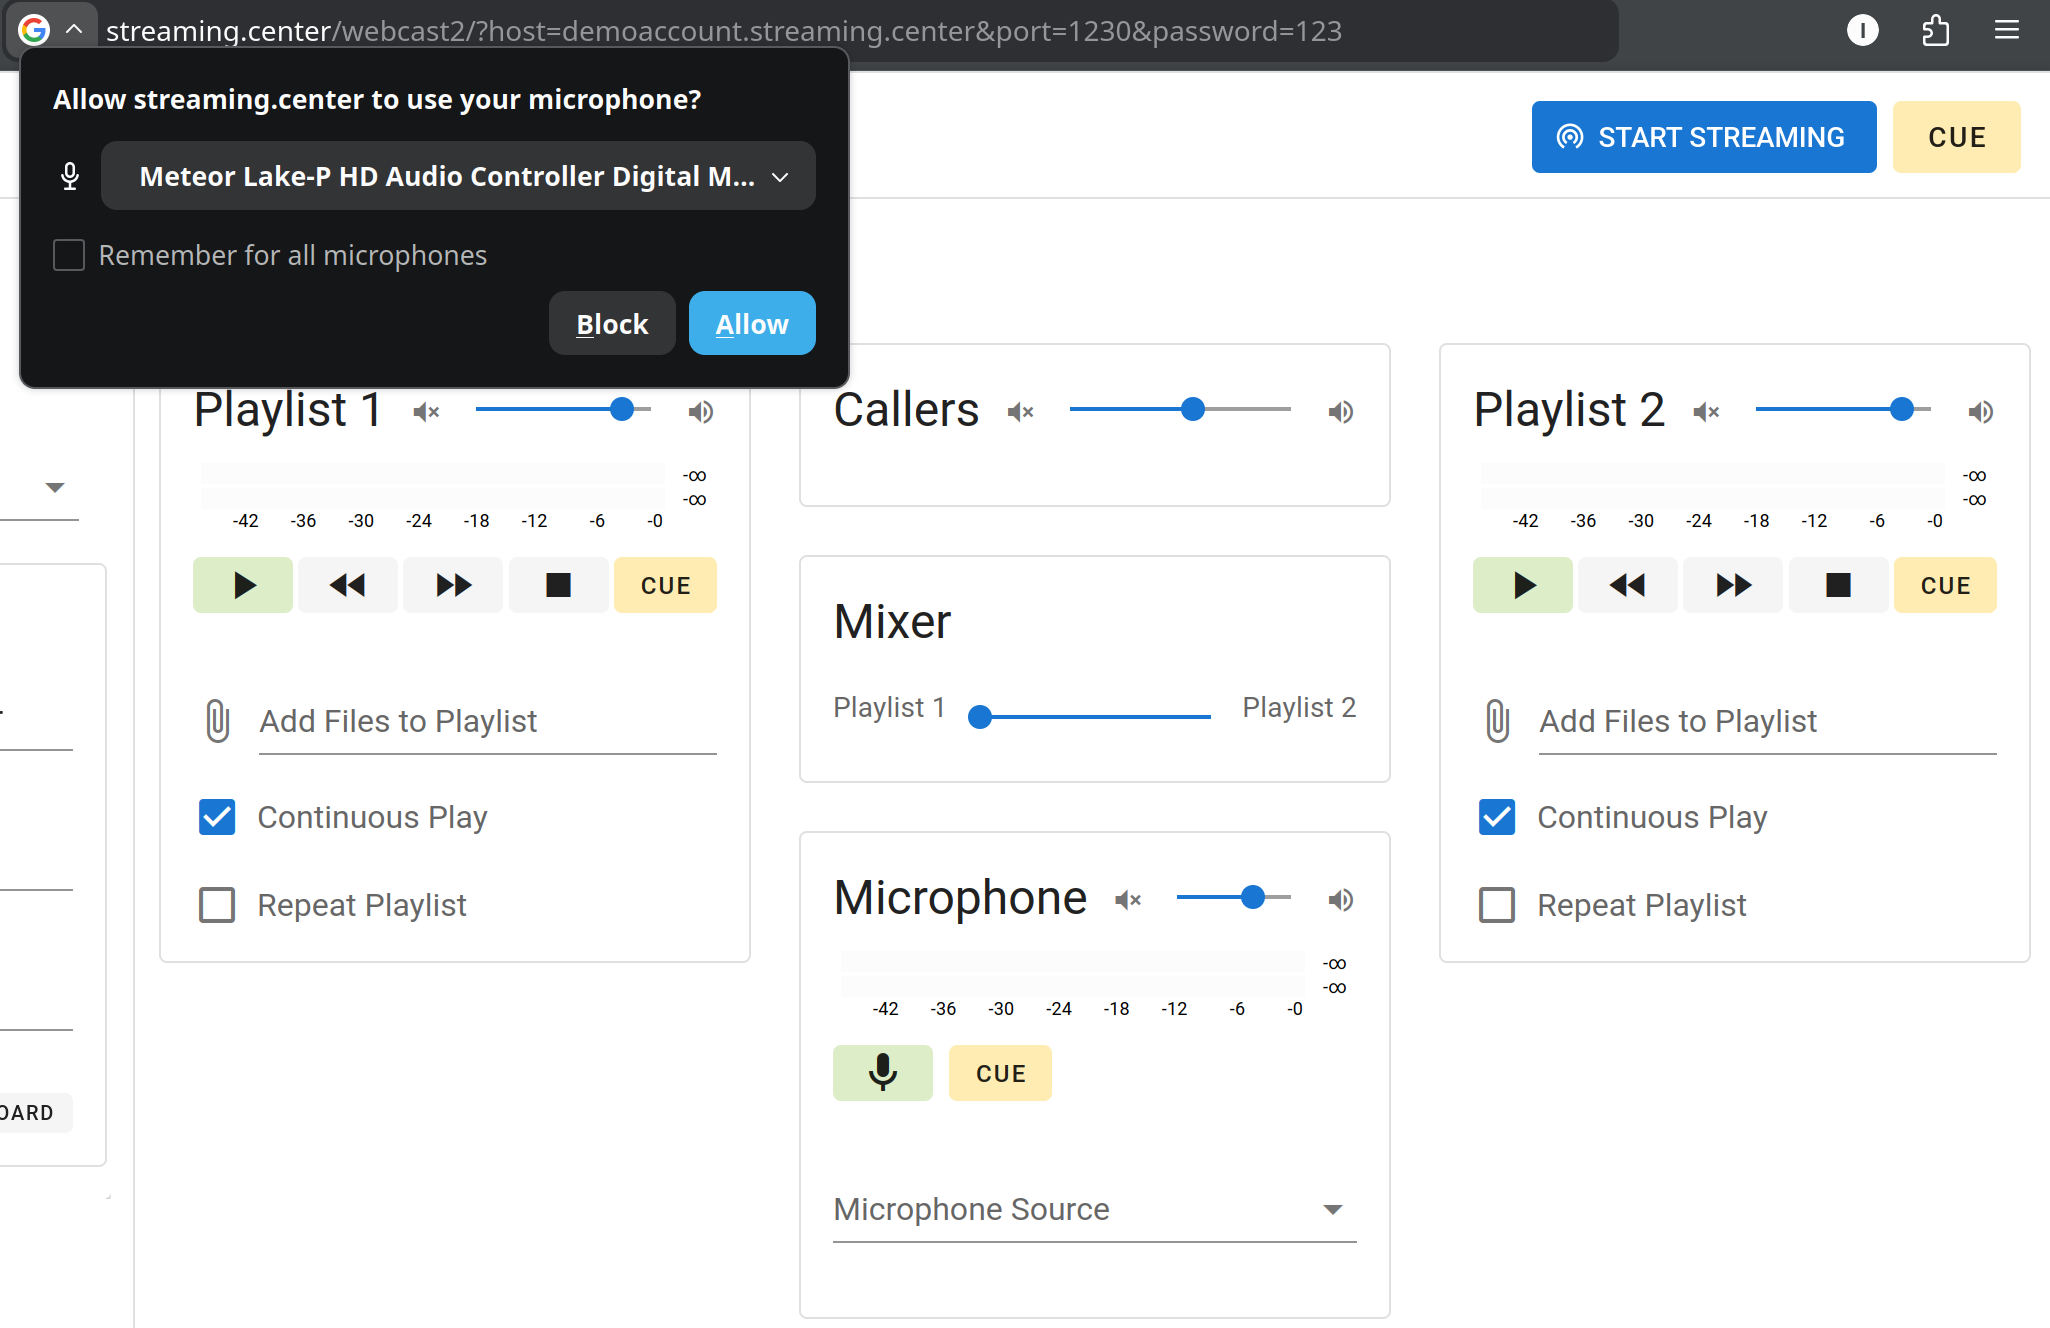
Step 5. Open Webcaster in your browser
Open the “Open browser broadcasting app” page.
If your browser asks for microphone access, allow it if you plan to speak on air using your microphone.
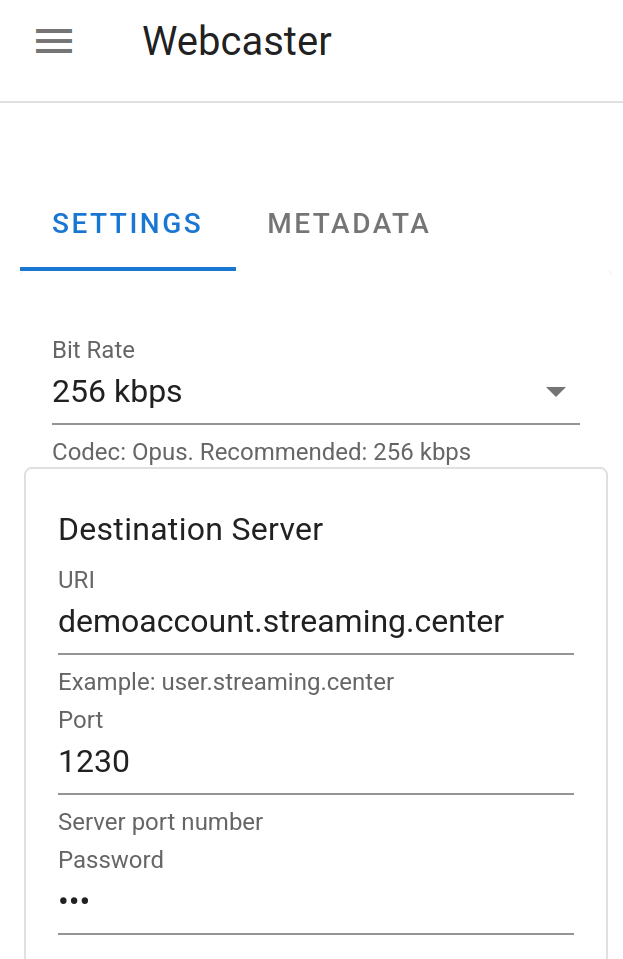
Step 6. Check the connection details
If the fields were not filled in automatically, enter the following manually:
- server address;
- port;
- streaming password.
These values are available in the DJ settings inside the control panel.
Step 7. Select an audio source in advance
Before starting the broadcast, make sure you choose what will be sent on air.
You can:
- enable the microphone;
- add audio files to the playlist;
- use both the microphone and files, depending on your needs.
Important: before connecting to the server, at least one audio source must already be selected.
For example, the microphone must be enabled or files must be added to the playlist.
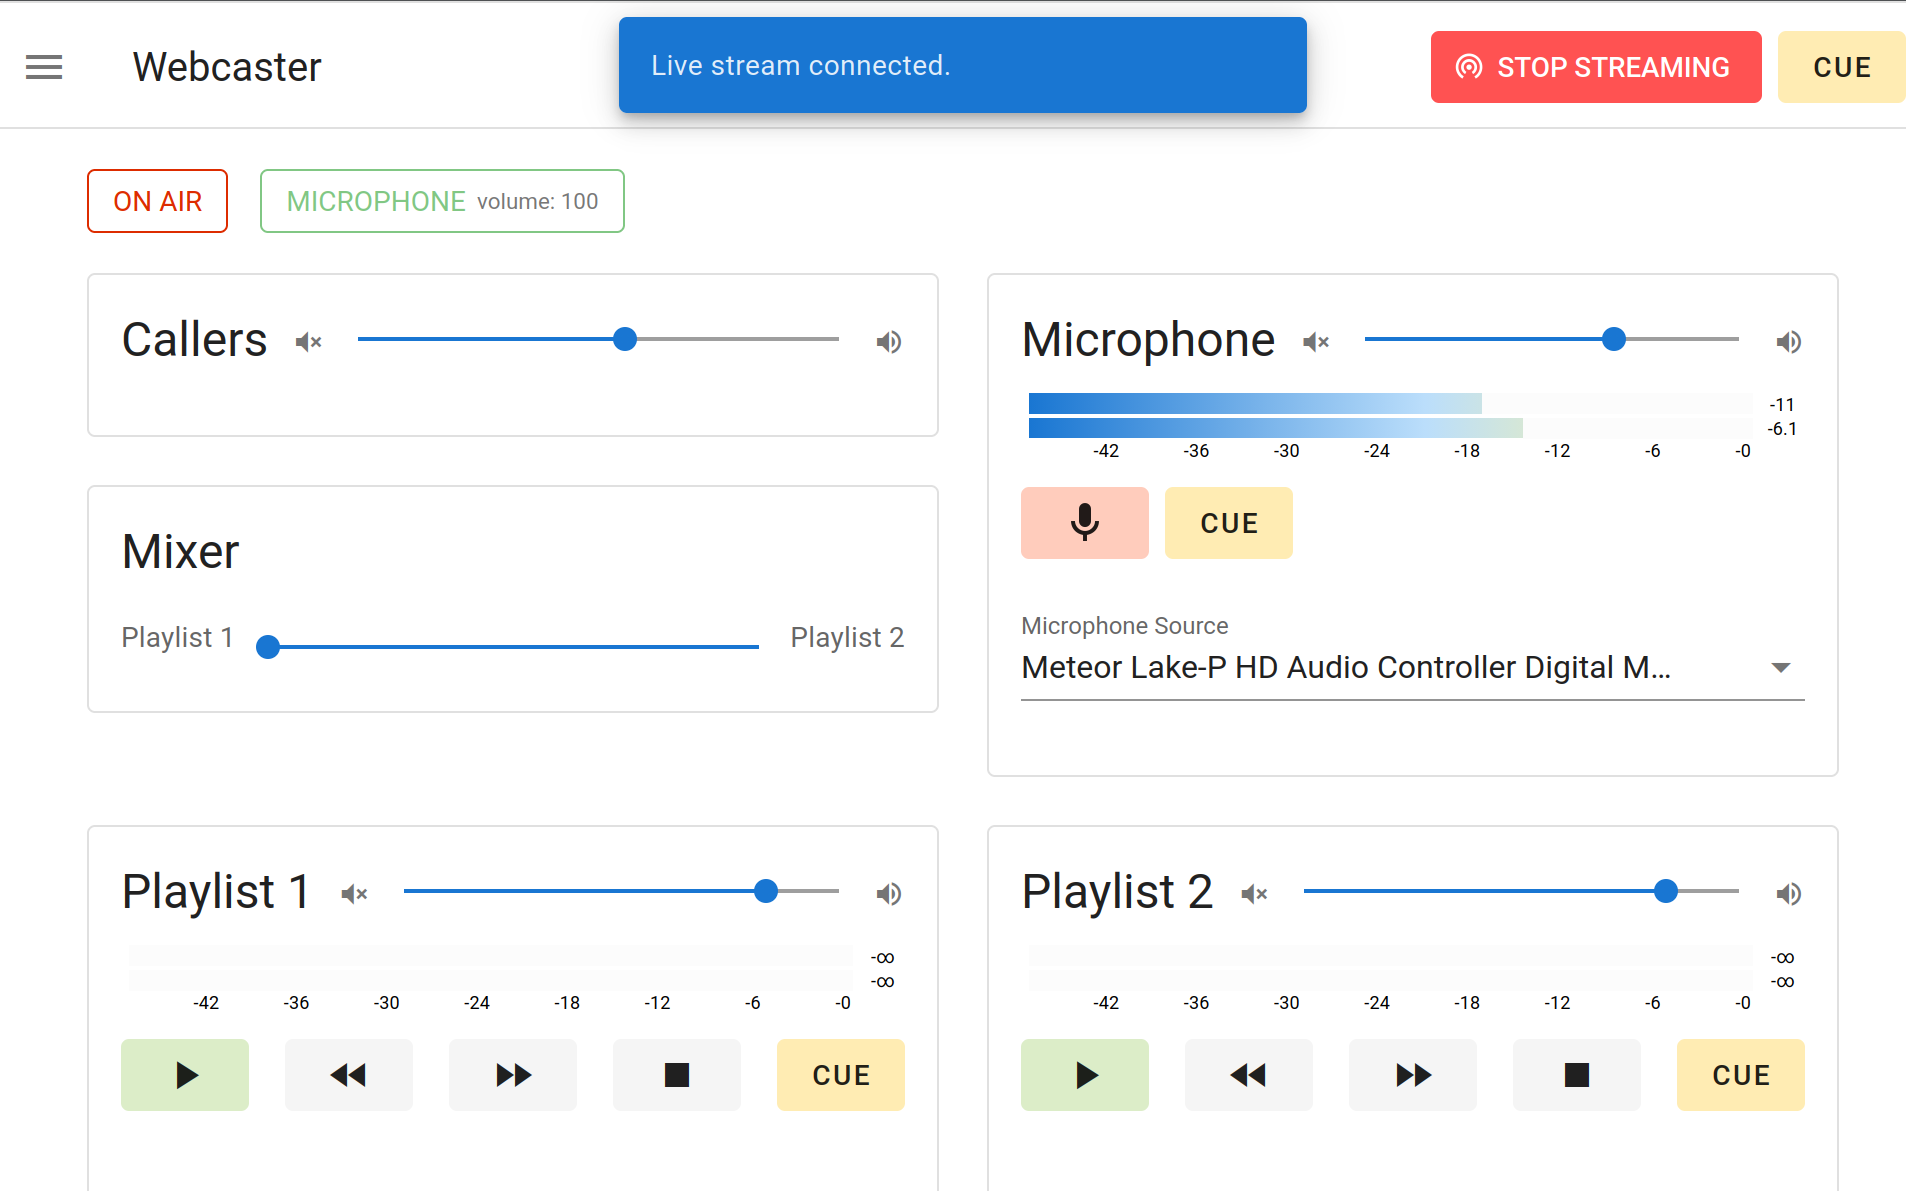
Step 8. Start broadcasting
Click the blue “Start broadcasting” button in the upper-right corner.
If everything is correct, Webcaster will connect to the server and the button color will change.
After that, in the DJs section of the control panel, you will see that the DJ is connected.
How to accept listener calls on air
Step 9. Get the call link
After entering the server address, port, and password, Webcaster will show a “Call link” button and a button for copying that link to the clipboard.
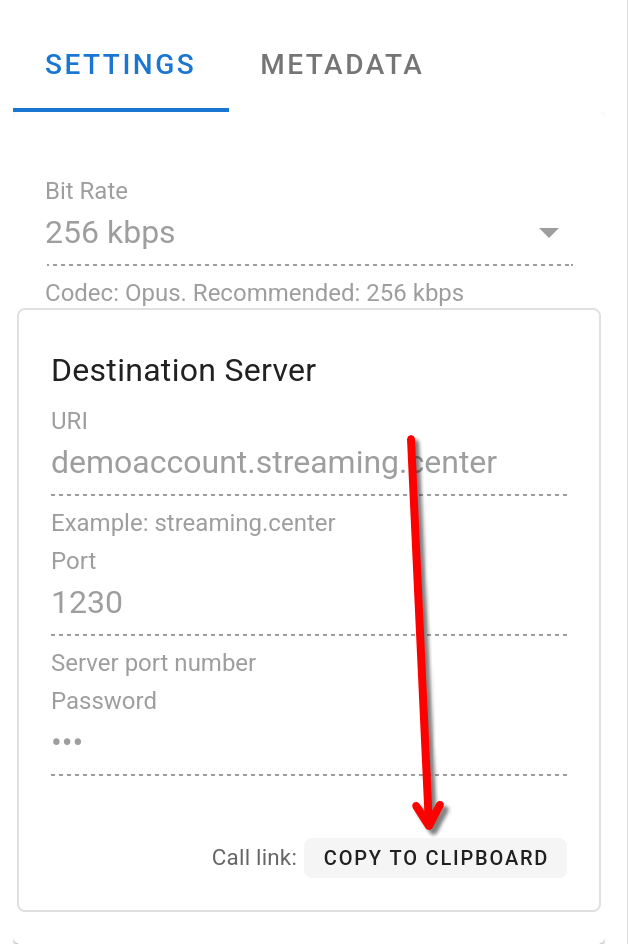
Copy this link and send it to the listener in any convenient way, for example:
- in Whatsapp;
- in Telegram;
- in a direct message;
- by email;
- in any other messenger.
Step 10. The host must already be live
To accept calls, the host must already be connected to the broadcast and live on air.
In other words, first start the live stream in Webcaster, and only then begin accepting listener calls.
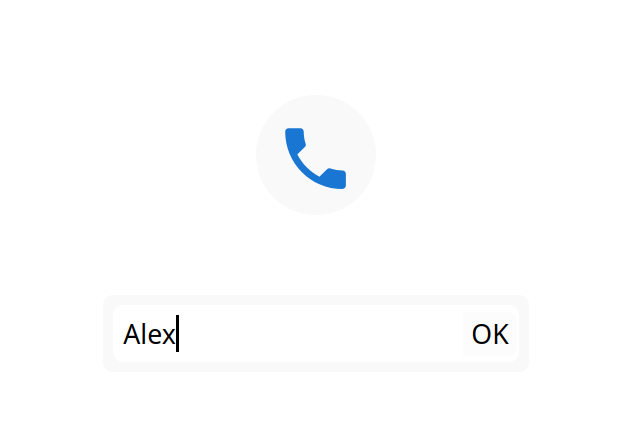
Step 11. What the listener does
The listener opens the call link in a browser on a phone, tablet, or computer.
Then the listener:
- clicks the call button;
- enters their name;
- sends the call request to the host.
The name is shown to the host so they can see who is calling in.
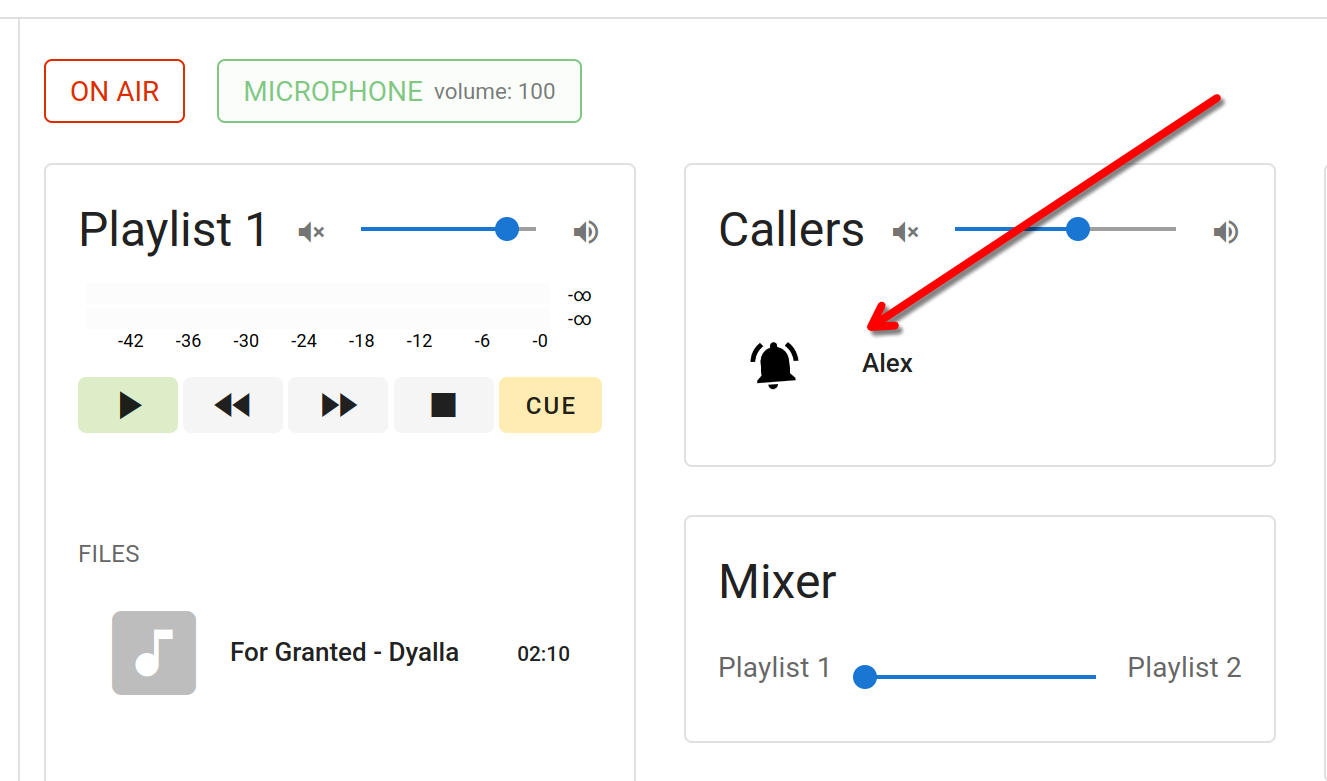
Step 12. Accept or reject the call
When an incoming call arrives, you will see it in the “Calls” section together with the caller’s name.
You can then:
- accept the call;
- reject the call using the red cross icon.
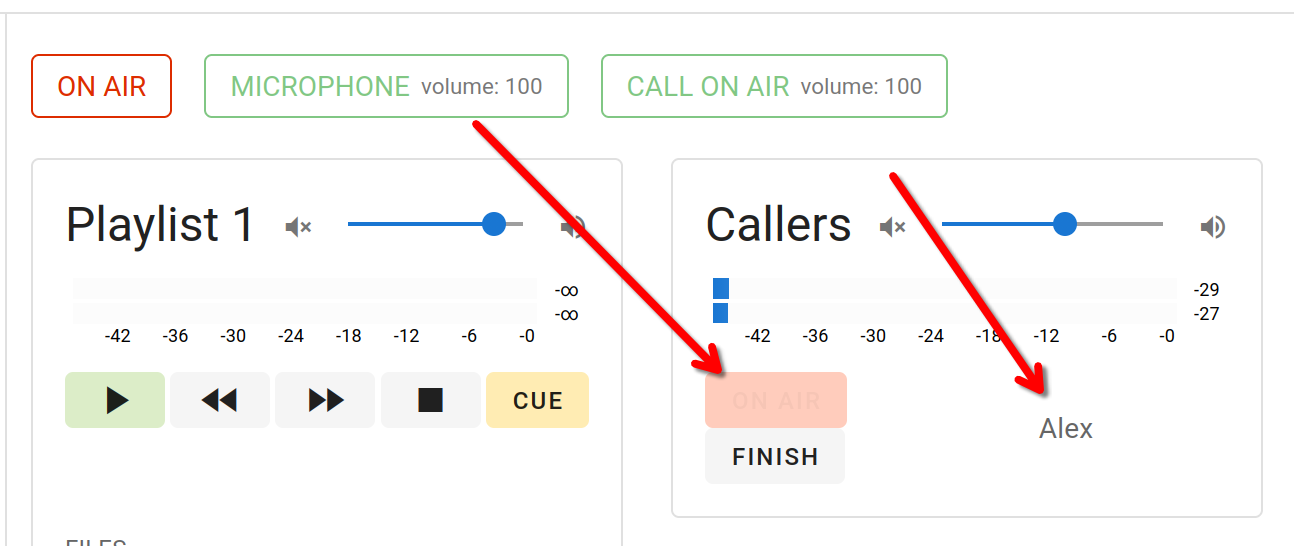
Step 13. Put the caller on air
After you accept the call, the connection is established, but the caller does not automatically go on air immediately.
To put the caller on air, click the “ON AIR” button below the accepted call.
After that, the listener’s voice will be heard in the live broadcast.
Important requirements
1. HTTPS is required
Browser broadcasting and calls work only if the control panel is opened over HTTPS.
This means:
- the panel must be available on a domain name, not just an IP address;
- the domain must have a valid SSL certificate installed.
Without HTTPS, browsers usually block microphone access and do not allow these features to work correctly.
2. Use modern browsers
We recommend the latest versions of:
- Google Chrome
- Mozilla Firefox
These browsers provide the most stable experience for browser broadcasting and listener calls.
Support in other browsers, especially older versions and outdated mobile devices, may be limited.
In short
Webcaster lets you run an internet radio broadcast directly from your browser, without installing software. You can go live quickly, speak through your microphone, play audio files, and accept listener calls on air using a simple link.
It is a simple way to run a modern live broadcast from a computer or mobile device.
Useful tip
Before your first real live show, it is a good idea to do a short test:
- create a Web-browser Dj
- open Webcaster;
- allow microphone access;
- connect to the server;
- make sure audio is being transmitted;
- send a test call link to yourself or a colleague;
- test receiving a call and using the ON AIR button.
This helps you confirm in advance that everything is working correctly.